How To Create an Advertising Account on Facebook
Step-by-step guide on how to create a Facebook advertising account.
In this blog, you’ll learn about setting up your Facebook advertising account.
You’ll also find below the question-answer among other things.
1. What is Facebook Business Manager?
2. How to set up your Facebook Business Manager account?
3. How to access your Facebook advertising account?
4. How to navigate your Facebook advertising account?
5. How to manage Facebook Business Manager permissions?
If you’re unclear on how to get started with Facebook advertising, no problem – I covered it in this blog.
In the next section, you’ll find stepwise instructions for how to create an advertising account on Facebook, along with guidance for working with Facebook Business Manager and Facebook Ads Manager.
Facebook Business Manager is designed to manage your Facebook Pages and ad accounts.
You can do the following by using Facebook Business Manager:
- Handle approach to your Facebook Pages and ad accounts – notice what person has access to your Facebook pages and ad accounts you can also remove or change their access level.
- Work with marketing agency Facebook ads – you can also share your Facebook Business Manager account with your ad agencies so that they can help you handle your Facebook ad campaigns.
The business Manager account also manages your multiple ad accounts and users.
Here’s an analysis of the two roles applicable in Facebook Business Manager: Admin and Employee:

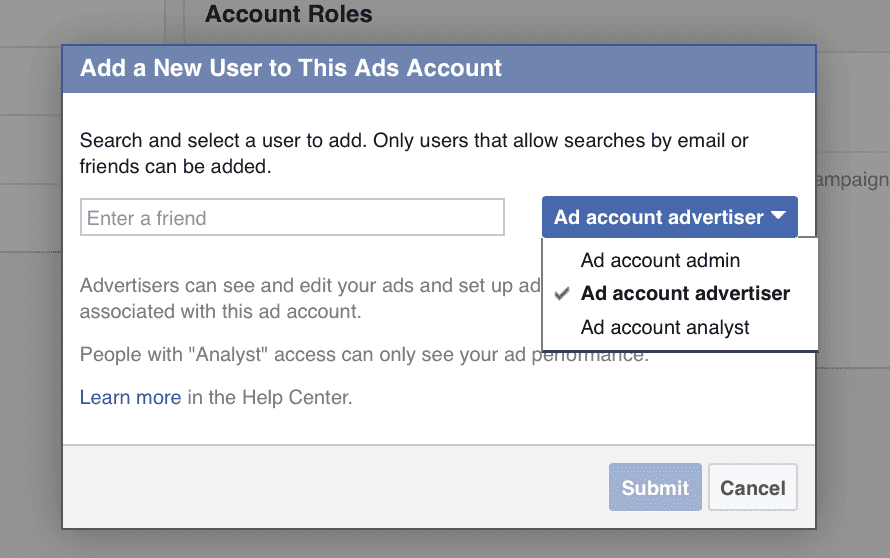
There’s a various sets of roles for Facebook ad accounts that you can also handle and edit in the Business Manager.

A minimum of one Facebook page is mandatory to have in business Managers to create a campaign.
For adding a Facebook page in the business manager:
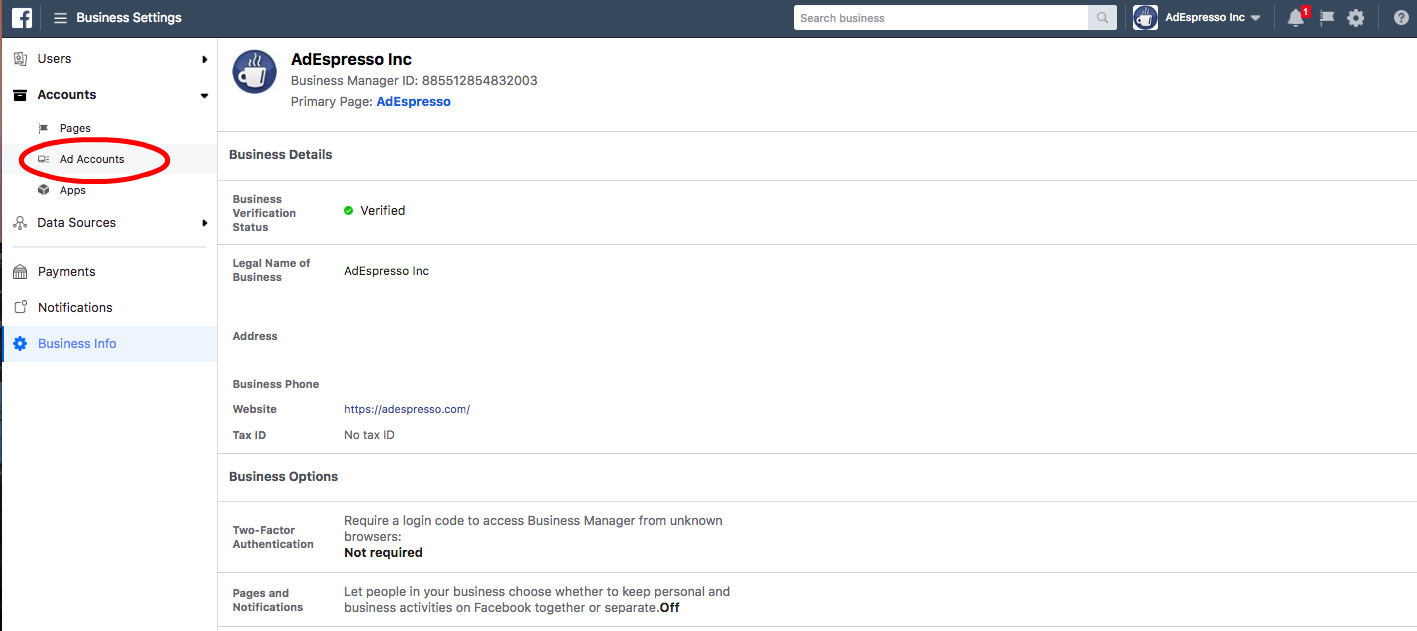
Go to setting in Business Manager.
1. Click the accounts-> Ad account on the left.
2. In the column of Ad account, click on the blue CTA “Add account”.
3. Select one of the three options “Claim Ad Account”, “Request Access to an Ad Account” or “Create a New Ad Account”. 4. You have to enter the Ad account ID in case you choose to request access or claim an Ad account.
You can start advertising but before that, you’ll require to give Facebook extra account information and put your credit card information as a payment method for your ads.
How do I claim my business manager on Facebook?
Claiming your business manager on Facebook is as easy as 1-2-3. First, you will have to create a business account in order to access your business manager. Then, you’ll need to confirm your business name and email address. Finally, you can log in with the credentials you set up during the signup process and start using the Business manager to manage your business. It’s that simple!
Setting Up Your Facebook Ad Account Info
Without setting up a payment method you can not make your first campaign. This handles the running of your ads. You have to set up your ad account once, you don’t need to do this again until you require to modify the payment method or make a new ad account.
Let’s jump to our ad account settings and set this up!
Go to Facebook Business Manager, and click on “Ad Accounts” placed under “Accounts”. Fill in all the blanks by putting your company’s name, address, and other related information.

If you are doing business in the EU, you’ll also be a move to enter your VAT number. Facebook will permit you to pick out your billing currency and your timezone. Be very careful with this information as you will not be able to change it once you’ve made your ad account.
Once you insert your company data, you will need to enter your billing details.
Setting Up Your Facebook Ad Account Billing & Payment Information
Now it’s time to put on our payment mode so we can move ahead with creating a Facebook campaign. To enter CC or Payment mode detail Go to your Ad account click on setting->Payment.
You will direct to the Billing page where you can:
- Add a new payment mode.
- Edit your existing payment methods
- Setting up account’s spending limit
- View your next bill

To add a new payment model to your Facebook ad account:
- Click on “Add Payment Method” button
- Select the method you need to add
- Enter your information
- Click on “Continue”

Facebook gets numerous payment options, containing credit cards and PayPal payments so you have an excellent volume of flexibility when it comes to how you pay for your Facebook ads.
Professional Tip: Add multiple payment options
When you get started advertising more and more, we advise that you add an alternate payment method. This avoids Facebook from closing all of your campaigns should your primary card expire, reach your monthly limit spend, or be blocked for any reason.
When your elementary card billing is neglected, all of your campaigns will be shortly paused as far as you pay the outstanding balance. This can be enormously harmful if you are executing campaigns for a very long time that are achieving great results, as the pause will break the learning phase that has been done on the campaign so far.
If you have set up a secondary payment method, Facebook will start billing your alternate method and everything will have to work smoothly.
The payment method can also be changed or edited from the payment setting screen.
Please note that you can’t delete your primary payment source, so you’ll require to create another option for your primary source before deleting your current primary payment method.
Editing Your Payment Options
If you need to make changes to your Facebook advertising payments, you can make it on the same page by clicking on “Edit Payment Methods.”
If you have listed multiple payment options, you can choose which one’s primary.

When & How are you billed?
You can expect a bill from Facebook for two times:
- At the closing of every month.
- When you hit your billing threshold.
Every time your primary payment method will be charged when you reach a certain billing threshold that’s what billing threshold means. The amount of the threshold depends on your billing history.
This threshold will be fairly low when you first begin advertising (normally $25), and you’ll be billed when you spend $25 in Facebook Ads. As you keep consuming and your payments are accurately processed, your threshold will be automatically increased to $50, $250, $500, and finally, $750.

There will not be any direct impact on your advertising campaigns by these thresholds: they just affect how generally you’ll be charged. The huge advantage of having a big threshold is that you’ll have to deal with a few invoices. If you need to change your threshold or have trouble with billing, you can contact Facebook support.
Setting up the account spending limit
By setting an ad account spending limit you can manage your total ad costs. when you attain the limit that you set, your ads will pause and won’t run over until you rise or remove that limit. Have this in mind in the future should you ever find your ads are not running and you don’t recall why!
Facebook Ad account spending limits are specifically helpful when working with marketing agencies when you want to be sure your Facebook marketing expert or Facebook advertising agency won’t be able to consume more than you’ve planned across all of your Facebook campaigns.
You’ll have to update it very often if you set it too low. Please note that every time the limit is reached, all of your Ad accounts will be paused for at least 15 minutes.
Facebook Ad Account Limits
Whether a marketing agency or marketing expert like it or not, but Facebook Advertising account will have some limits. They should not disturb you most of the time, but it’s great to get to know them from the beginning.
Below are the limits of Facebook Ads Manager:
A single user can manage up to 25 Facebook ad accounts.
A typical ad account can have up to 5,000 ads that aren’t deleted.
A regular Facebook ad account can have up to 1,000 sets that aren’t deleted.
A regular ad account can have up to 1,000 campaigns that aren’t deleted.
An ad account can have up to 50 ads that aren’t deleted per ad set.
Facebook
These limits only implement on non-deleted campaigns and ads. If you cross any of these limits, all you have to do is delete old campaigns and their ads.
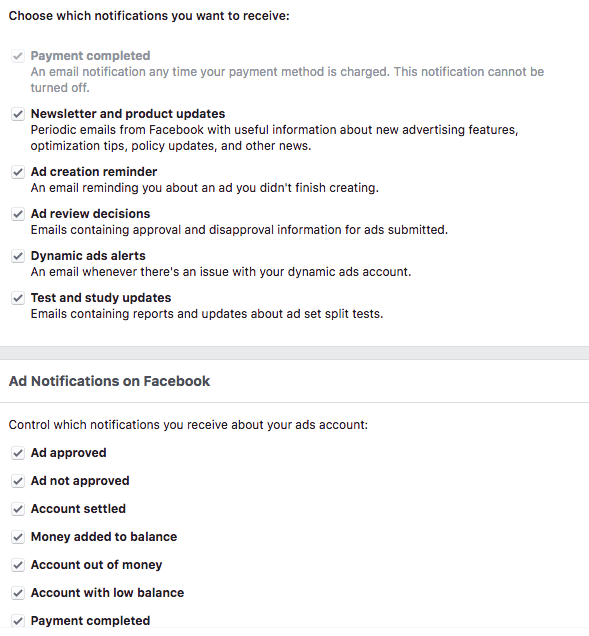
Review Your Notification Settings
It comes without saying that you’ll need to be learned about important updates happening on your advertising account.
Facebook Notifications are a good way to be updated about your campaigns. However, they can also full your inbox instantly, so you may want to adjust the number of email notifications you receive from Facebook to fit your needs.
For notification settings:
- Go back to your Facebook ad account settings
- And there Click on “Notifications”
- Add or Remove according to your wish to receive email notifications about it.

To get the essential notifications via email and others as Facebook notifications set up your notifications that will pop up when you log in to your business manager.
Review Your Ad Account Roles
Roles come to play when you have been set up ads for a while you may wish to hook up with another person. And to add new users and admins to your Facebook advertising account, go to the “Account Roles” menu tab.
There In your ad account settings, click on “Ad Accounts” and scroll down to the bottom. Below your attribution settings, you’ll easily set the roles.

When you click on “Add People”, you’ll be able to edit the existing users’ permissions and add new users.

You’re all set once you’ve finished the account management and invited your team members.
Congratulations! You’re ready to go!
Your Facebook ad account is completely ready and waiting for you to launch those first campaigns!


